1.1 Compare data formats (XML, JSON, YAML)
1.2 Describe parsing of common data format (XML, JSON, YAML) to Python data structures
1.3 Describe the concepts of test-driven development
1.4 Compare software development methods (agile, lean, waterfall)
1.5 Explain the benefits of organizing code into methods/ functions, classes, and modules
Organising your code into switch statements, functions, classes and modules can:
Reduce the amount of code that is reused, and reduce the number of nested if statements.
Make code easier to read.
Make code easier to debug.
Using objects allows you to organise your code more around objects than logical flow.
Functions are a control flow mechanism. They allow a block of code to be assigned to a function name and then executed on demand. The code doesn’t run until it is invoked.
You can also pass paramaters into functions, that lets you supply values to the function that can be used.
Methods are functions defined as part of a class and invoked by instances of that class.
Class defines state and behaviour of an object in OOP.
Objects are instances of a class, that can be created, destroyed and manipulated in isolation from one another.
1.6 Identify the advantages of common design patterns (MVC and Observer)
Singleton Design Pattern
Singleton design pattern is very simple and straight forward. It’s simple to implement in different languages and can be useful.
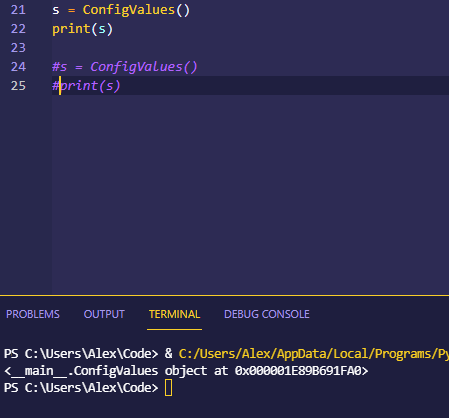
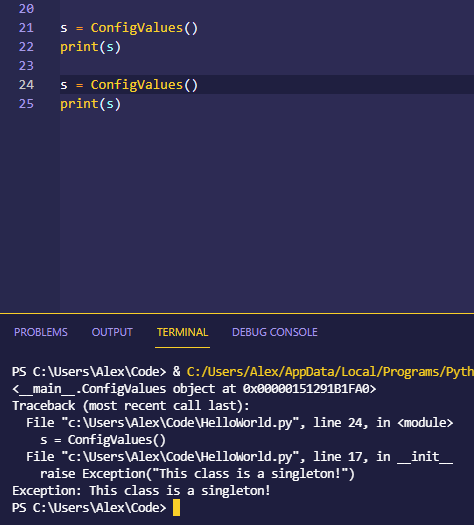
It is a pattern that restricts classes to only being instantiated once during the execution of the program.
“A class with a private instance variable representing its only instance, a public get/instance() method to retrieve that object, and a constructor to enforce single-instantiation”
This means a class creates just one object, and that’s the only on it ever creates. You never create any new objects, you can just refer to that first one that you created.
It’s useful for things like database connections, config values that you might load up when the program first starts and then use throughout it, or for constants/static values.
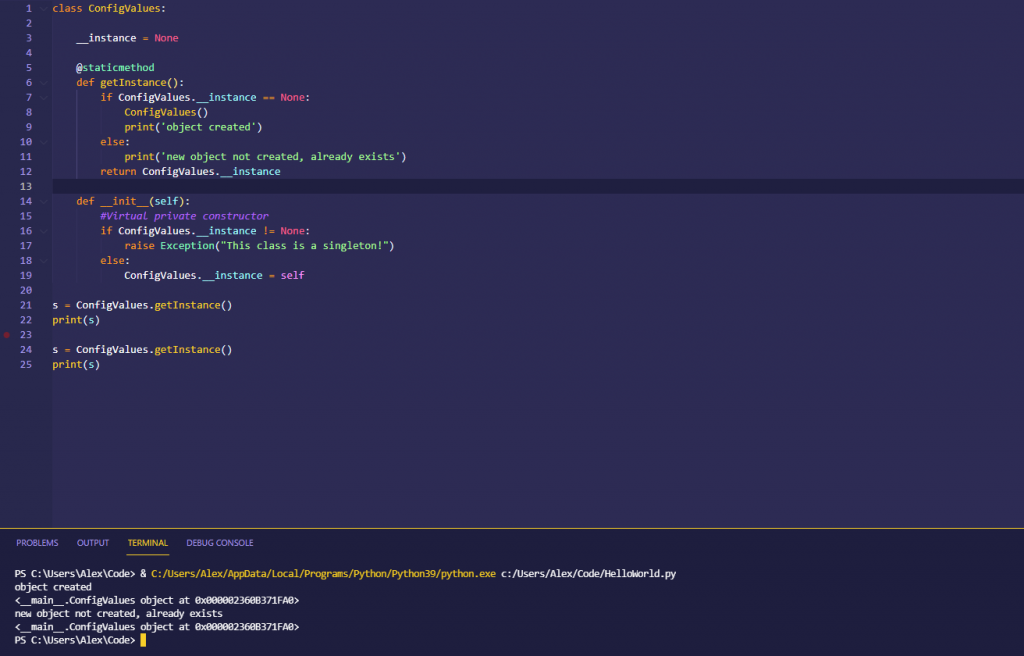
If you were to try and raise a second version of this object you get an exception raised.
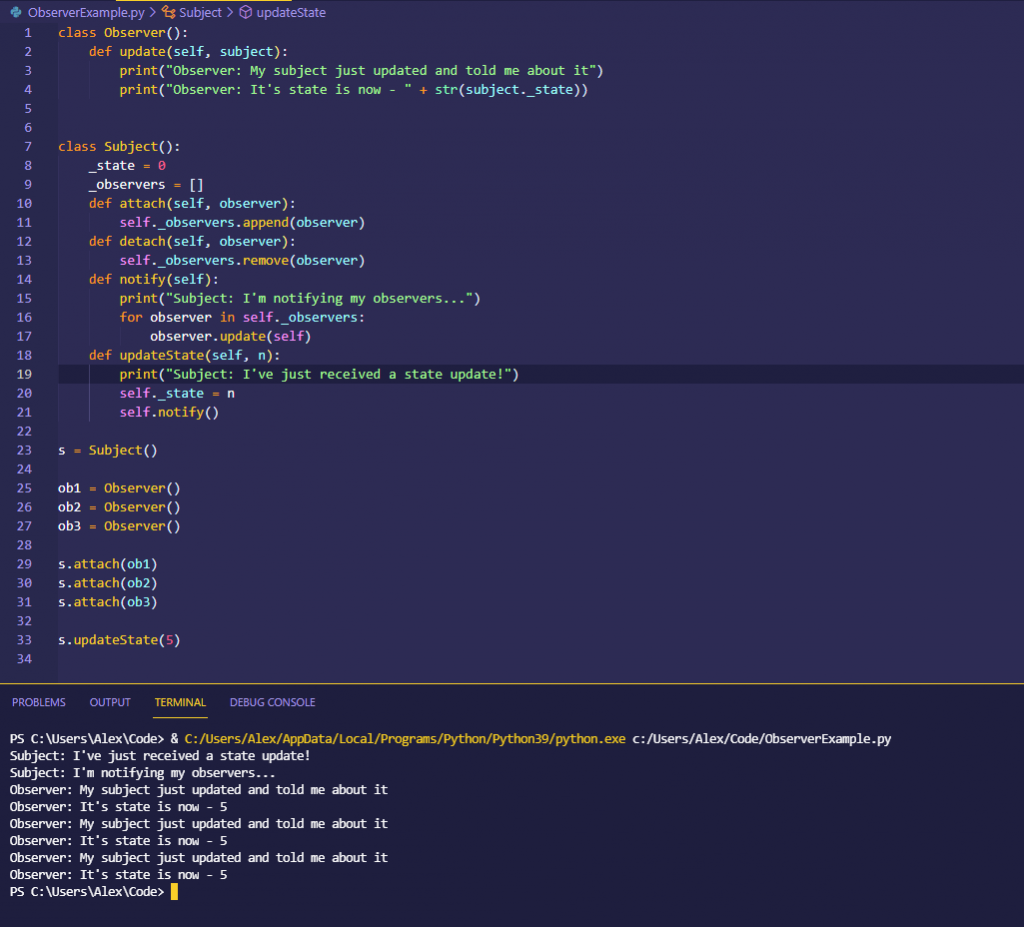
Observer design pattern
A pattern that allows multiple ‘observer’ objects to recieve updates or notifcations when one or more sources, called the subjects, change.
It allows objects to react or respond in response to events. It is popular in UI systems. (Updates are push only)
In this pattern two classes are defined:
The Subject, which maintains a list of observers and includes methods for attaching, detaching and notifying observers.
The Observer, which has a method to recieve updates from the subject.
Model View Controller
MVC is a higher level, more abstract design pattern. It is very popular in web applications. There are lots of libraries and frameworks that enable this design pattern, but for proof of concept the example used doesn’t have much of a real world appliction.
It is a high level abstraction where responsibilities are divided up into three loosely coupled components: The Model, View and the Controller.
As long as your interface between these three components is well understood and well documented you know where your responsibility lies as a developer for each component.
Model: The component that stores your data
View: The component that displays data (what the end user see’s when interacting with your appliction) – The View communicates with the controller.
Controller: The component the handles logic flow, user interactions, and directs models and views. It is the intermediary between the model and the view. It’s role is to receive data from the view and pass it to the model.
TO ADD – CODE EXAMPLE (22)
1.7 Explain the advantages of version control
1.8 Utilize common version control operations with Git:
1.8.a Clone
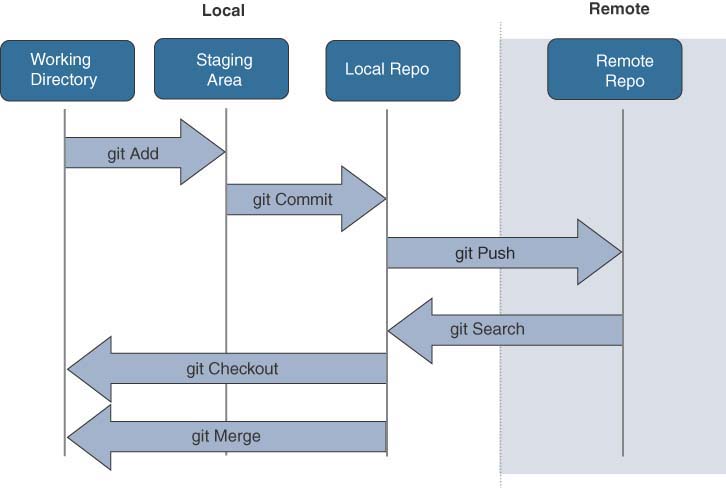
When you want to work with someone elses code (or repository) you first need a copy of it on your own device. This is done wit the git clone command, and requires you to know the location of the repository.
git clone https://github.com/CiscoDevNet/dne-dna-code

This clones the entire repository, including all previous commits. (This can be viewed by typing git-log while in the directory.
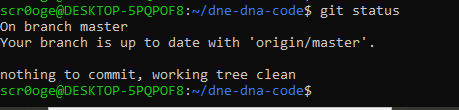
When you first clone a repository, you should be viewing and working on the master branch, which is the defult branch for a repository (It doesn’t have to be called master but that’s what it is). You can verify what branch you are working on, and the current status of your working tree with the git status command.
1.8.b Add/remove
If you make any changes to the code base in the working directory you can add them to the index so that git will start tracking them.
- git add . or -A: Adds everything in the entire local workspace.
- git add (filename): Adds a single file.
This adds all new or deleted files and driectories to the index.
Removing files from Git is not as simple as just deleting them from the direcotry. The best way to remove tracked files is with the git rm command:
git rm -rf folderToRemove
Similarly you can use git mv in the same way you use the mv command in Bash to move a file from one place to another.
1.8.c Commit
When you commit a file you move it from the staging area (after it has been added with git add) to the local copy of the repository. Git doesn’t send entire updates, it just sends changes that have been made to files. The commit command bundles the changes to be synchronised with the local repository. To commit the changes that have been made you need to type:
git commit -m "This is a commit message"
You need to add a commit message too, if you don’t you’ll be taken to a text editor to add one in once you’ve typed git commit. It gives you the opportunity to outline the changes you’ve made, and it’s good practice to include a meaningful message.
1.8.d Push / pull
Git can be used as a local version control system to keep track of changes made to documents and files. It is also extremely powerful for allowing collaboration.
To use a remote Git repository you first need to set it up with some information so Git knows where this repository is. If you are pushing to a repository you have cloned from Git will remember where it is.
If however you are pushing it somewhere for the first time you will need to specify some information regarding the remote server you’re pushing it to. This is done with the
git remote add nameOfProject www.github.com/myProject
You can see which remote repository is already configured with the command git remote -v and if you make a mistake or want to stop tracking your reporoty you can use the git remote rm nameOfProject command to do so.
In order to share your code with others you firs have to tell Git to sync your local repository to the remote repository. This is done with the command git push.
git push remoteName branchName
It requires a remote name, which is an alias to identify the remote repository (Usually the name origin).
You can also reference a branch name with git push if you want to store your files in a separately tracked branch from the main repo.
The purpose of the git push command is to transfer your files and updates to your git server.
The command git pull syncs any changes that are on the remote repo and brings up your local repo to the same level as the remote one.
git pull (remotename) (branchname)
When you are working with git one of the first commands you’ll want to use it git pull, so you can get the latest version of code from the remote repo.
git pull does two things. First it fetches the latest version of the master repository and then it merges it into the local repository. If there are conflicts they are handled in the same way they would be if you issued a git merge command.
1.8.e Branch
If you start editing files on the master branch and committing changes your local repository would be out of sync with the remote server. If, before you pushes their changes to the central repository before you do you’ll have to reconcile any changes first. You can’t even get updates from the central repo on this branch until this is reconciled.
scr0oge@DESKTOP-5PQPOF8:~/dne-dna-code$ git checkout -b mycode
 Switched to a new branch 'mycode'
You can use the git checkout command to switch between branches. Adding the -b option to the checkout command causes Git to create a new master branch and then switch to it.
When you create a branch on your local repository, you are creating a space in which you can safely make changes to the repo. Any changes you make and commit are only committed locally to this new branch. Since you aren’t making changes to branches cloned directly from remote repos you can easily pull updates to these remote repos down to your device.
As you, or others, make changes to git repositories your branch will get out of sync with the remote repository. As others push commits to the server you need a way to download these updates to your local repository. If you’ve been making your changes to your own local branch, you can update your local repo with the updates from the remote repo with the git fetch command.
To add a git branch (but not switch to it) you issue the git branch command and supply the new branch name using the following syntax:
git branch -d branchname
(the -d flag deleted the source branch once the new branch has been created)
1.8.f Merge and handling conflicts
The git merge command is used to handle combining multiple branches into one. Once you have finished working on a branch you can merge it back into the main code (and deleting the source) using the git branch -d (branchname) command.
In order to merge branches Git has to compare all the changes that have occurred in the two branches.
When committing an updated branch to the remote repository you can use these commands:
git add.
git commit -a -m "new feature"
This syncs the remote branch wit the new changes, and you can switch back to the master branch:
git checkout master
From the master branch you can issue the git merge command and select the branch to merge with (the one that has the changes in it).
git merge newfeature
If there are no conflicts this is all you need to do. Git will automatically merge the branches and create a new combined commit that includes the new content from the newfeature branch.
At this point it would be safe to delete the newfeature branch as the code in it has been pushed out to the master repository.
Handling conflicts needs to be done when there are files that are being edited by multiple people. You can have a conflict with regards to which changes will take precedence.
Though git will attempt to handle these changes automatically but when there is a conflict human intervention is necessary. This can be done either by editing the file (git will tell you which one) or to delete a conflicting file.etc
1.8.g diff
The diff command allows you to compare files and text to see which one you want to use if there’s more than one option available. It can make it easier to work out what to keep and what to discard when you have conflicts in code.
git diff --stat branchname
git diff looks at the history of your commits, files, branches and other git resources. It’s an effective troubleshooting tool and can be used in conjunction with lots of command line parameters.