When you get a Junos device straight out the box it is in it’s factory default configuration. Different devices have different default configurations.
Some setup is consistent across all devices such as syslog settings, no root password configured and no Telnet/SSH access.
Default Config:
MX series (Routers) – nothing is set and it will need to be configured.
EX series (Switches) – There is a default untagged vlan, RSTP (spanning tree) is enabled and IG-MP snooping is enabled. Could be used out the box as an unmanaged device.
SRX (Firewall) – Out the box devices are divided into zones, some trusted some not (specifically ge-0/0/0). Again an untagged vlan.
Login and initial configuration:
When you first connect to an end device you will do so with a console connection, and when set up correctly you’ll be greeted with a login option. Hostname will be Amnesiac, and it will have no root password.
You start by logging in (root) and if it’s factory reset there will be no password set. Once signed in you will enter the shell environment. (Not the juniper environment, it’s linux terminal)
You enter the Juniper CLI environment from the shell with the command cli .
Enter configure to enter config mode and you’re ready to go.
Set root password: set system root-authentication plain-text-password
Then enter your new password in (for the sake of this password123).
From here you can confirm it’s in the config by running: show system root-authentication and it should be displayed (or at least the hash of it will be).
It will always be a hash, plaintext passwords are not stored in the configuration. This has to be done before any other configuration can be committed.

Set Hostname: Setting a hostname is a good idea because it can be used to identify its purpose or location, as well as show immediately that there is already configuration on the device.
set system host-name labSRX
Set NTP Server: Having accurate time on your network device is important, both to make logs useful, and because some services that use certificates require the time to match to a certain level between different service instances. In the below command pool.ntp.org is used because it is a publicly usable pool of NTP servers (DNS would also be required as it’s a domain name that would need to be resolved)
set system ntp server pool.ntp.org
Setting System Services:
From the configuration mode you can set system services that you want to enable, as there will be very few enabled by default on a fresh Junos install.
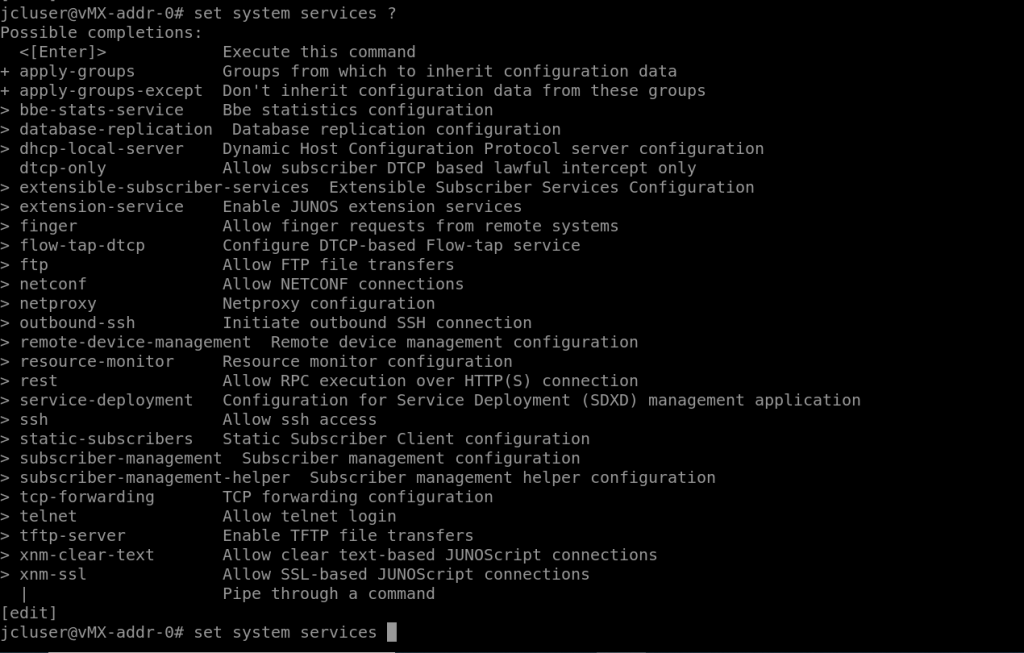
Actually activating most of the services just requires them to be called, so for SSH it would be set system services ssh.

There are lots of other settings that can be configured that aren’t under the services umbrella, for example timezone (set system time-zone Europe/London)

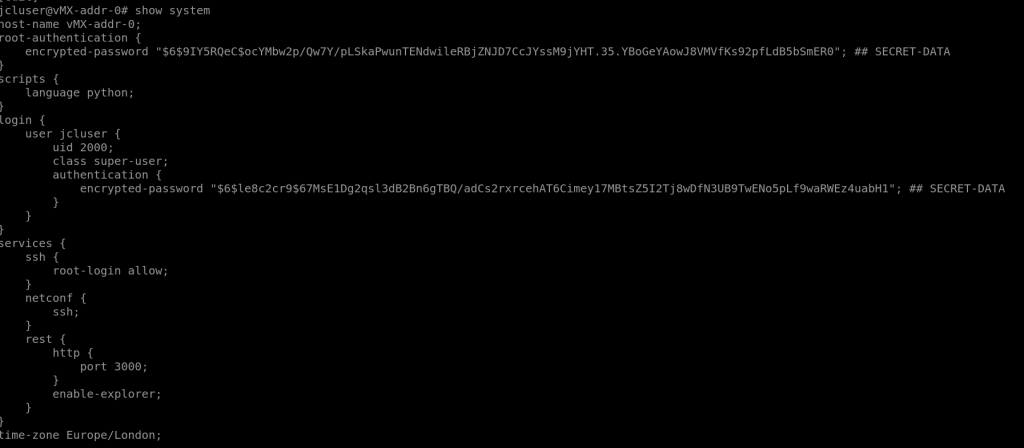
If you want to view all the config currently set on a Juniper device, from the configuration CLI you can enter show system and it’ll list all the setup for the configuration you’re editing:
If you change your mind while editing your candidate configuration, you can roll back your configuration to the current active config with the rollback 0 command and that will throw away any changes you’ve made.
Resetting a device to factory settings:
There is something of a nuclear option: request system zeroize which will erase all local data, config and logs. This doesn’t just set you back to factory default it absolutely nukes it.
A gentler option is to enter config mode with the config command, run the command load factory-default, which pulls the default config for the device. Assuming you have a root user configured you will then be able to run the commit command.
User Authentication
Local username and password: Local user authentication can be configured with multiple users are different levels of permission. A password must be set on this user account in order for it to be able to log into the device and a class must be set as well.
set system login user username authentication plan-text-password
set system login user username class super-user
When creating new local users they must have at minimum a class specified and must have a locally configured password, which should be encrypted.
For classes you can use a predefined class, such as superuser (basically root access), operator (can do some stuff, like manage line cards), read-only (gives access to show commands but can’t make changes) or unauthorised, which allows a user to log in, but the user can’t do anything.
You can also specify your own classes, which allows you to give users in that class granular rights, for instance you can specify certain commands that can be run (and some that can’t) or sets of commands (such as clear networking).
Default Login Classes:
operator (clear, network, reset, trace, view)
read-only (view)
super-user (all)
unauthorized (none)
Authentication Methods
Outside of the local configuration you can set up your device to authenticate users using either a Radius server, or a TACACS+ server, so you don’t have to manually make changes to devices.
Configuring Radius and TACAS+ (Radius server IP is 10.0.0.100 TACAS+ is 10.0.0.200)
set system radius-server 10.0.0.100 secret myGreatSecret
set system tacasplus-server 10.0.0.200
When a user attempts to SSH to a device that has Radius configured, as above, Juniper first kicks off the process by sending a challenge to the Radius server constructed from the password and username submitted (not cleartext).
The Radius server will then compare it against its own records, and if the challenge and response is valid it will send back a grant allowing the user to log in. (There is a common secret that both the radius server and the juniper device have configured, which allows this to happen – in this case xxxxxxxxx.)
set system authentication-order radius password

[System]
authentication-order [radius password];
radius server x.x.x.x {
    Secret xxxxxxxxx; }
In the code block above you an see that it first tries to authenticate against Radius, but if that fails it will use the local password.
In this example if a user has put the wrong username or password in – the Radius login will be denied, and if this happens the system will fall back to the local user configuration and check the credentials against the local database of usernames and passwords. If the password keyword is removed from the authentication order this behavior will not occur.
That’s not the end of things though, if the Radius server is unavailable – the device can still be accessed using local credentials even if password has been left out of authentication order.
Junos Interfaces and Terminology
Junos has some terminology it has inherited from its FreeBSD heritage.
IFD / IFL / IFF: The IF part of this terminology is an abbreviation of interface.
IFD refers to a physical interface (e.g. ge-0/0/0).
IFL refers to a logical interface, so there may be a logical interface in place built on top of the IFD.
IFF stands for Interface Families, might refer to a single Internet address.
When looking at the configuration of an interface you will be able to see these interface elements segmented.
SIDE NOTE – IN JUNOS, UNLIKE IOS, THERE MUST ALWAYS BE A UNIT WHEN CONFIGURING A PHYSICAL INTERFACE
Interface Types and Naming
There are 2 broad catergories of interface on Juniper devices, which are Network and Special interfaces.
Network interfaces physically connect to the network and carry network traffic.
There are 5 types of physical interface, with interfaces falling under one or more of the following cartegories:
Permanent – interfaces that are always present on a router, so interfaces that are built in (so like the built in ge-0/0 .etc) as well as an internal ethernet interface, that connects the PFE to the RE.
Transient – Interfaces that can be removed (so anything that screws in T1/E1 for example).
Network – Ethernet interfaces or SDH interface, primarily providing traffic connectivity. (again like ge-0/0/0)
Services – Interfaces that provide specific capabilities for manipulating traffic before it is delivered to its destination. It will not have a physical port and can be used to do things like encrypt traffic before it is then moved on through a physical network interface towards its destination.
Container – Interfaces that support automatic protection switching on physical SONET interfaces. (Not needed for exam)
Special interfaces can be either virtual or physical and perform functions like routing, management and monitoring. (For example the console port is a special interface)
There are 5 types of special interface as well. Some are physical like the console port, or the virtual chassis port used for management and switch interconnects. Others like loopback interfaces and the Routed VLAN interfaces are logical and do not have a physical connection.
Console Port – Physical port used to directly interface with the device. Can also be reverse Telnetted to.
Loopback Interface – Not a physical port, this one exists only in the software. It stays consistent on the hardware and is always accessible through all of your physical interfaces once it has an IP set.
Dedicated Management Interface – It is a network interface that is only for management access, transient traffic can’t pass through here.
IRB/RVI (Logical Routed Interface) – Another software only port, not physical and it is considered special.
Virtual Chassis Port – Any network interface can be configured as a VCP, so you can stack switches using them and manage them both from a single management interface and act like a single logical switch when stacked.
Management: me0, fxp0, vme
Internal: fxp1, fxp2, bme
Network:
Ethernet: fe, fe, xe, et, ge
SONET: so
ATM: at
Services: pime, pimd, sp, gre, etc
Loopback: Logical interface lo0:
One unit per Routing-instance i.e:
lo0.0 within inet.0
lo0.2 within VR2.inet.0
lo0.3 within VR3.inet.0
In Junos there is only a single loopback interface, but you can configure multiple subinterfaces.
Network Interfaces Naming Scheme !-! IMPORTANT OFTEN ON EXAM
Physical interface names use the following format regardless of type and hardware:
FPC: Flexible Pic Concentrator
PIC: Physical Interface Card
Port: Port on Physical Interface Card
interface-type-fpc/pic/port.unit
Interface Naming
Originally, back in the olden days of Juniper every line card was referred to as an FPC (flexible pick concentrator) which had modular PIC (physical interface cards) in them. Newer devices have other acronyms for different kinds of line cards, such as MPC and DPC. The CLI will still probably call it an FPC.
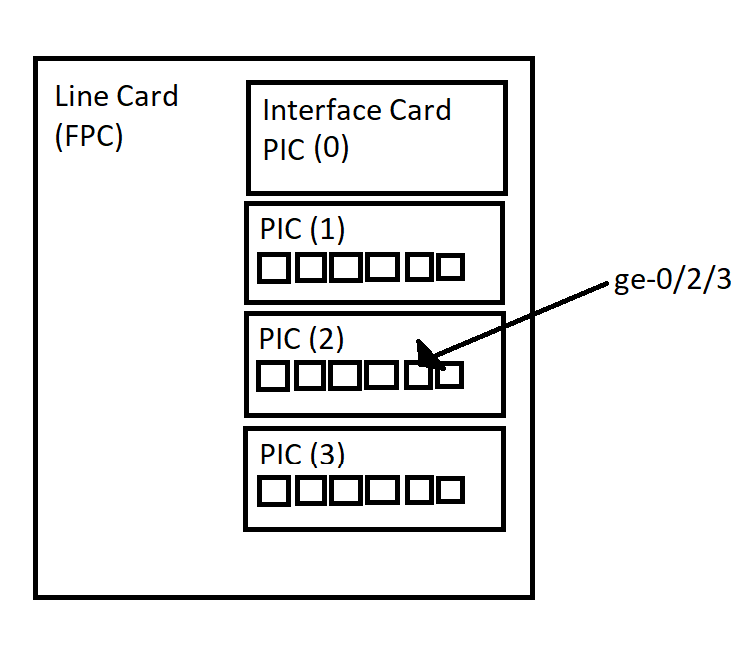
Interface Naming example: “ge-0/2/3”
The “ge” part stands for Gigabit Interface
The “0” is the FPC that is being used, so the line card 0
The “2” is the PIC slot in the line card, so in this case the third slot as count starts at 0.
The “3” is the actual port on the PIC, again starting at 0.
Configuration Groups
Configuration groups are a way to template some configuration so it can be rolled out to multiple places easily. It lets you apply config to all interfaces that share a common pattern (including things like wildcard matching). – An example is below (you get to that config option by running edit groups from top.
groups{
    GE_SPEED {
        interfaces{
            <ge-*> {
                speed 1g;
            }
        }
    }
}
Once the template is defined it then has to be applied. This is done by using the set apply-groups GE_SPEED in the example above. In show you can see that the apply groups statement is now configured. You will not be able to see this setting on an individual interface level however from the standard show command.
Instead you can view which interfaces are being effected by this group configuration by running show | display inheritance. We can then see hashed comments telling you where attributes came from, and the interface configuration with the inherited config.
Logging configuration
Every Juniper device will have some level of logging enabled by default. There will be logs stored in the messages file (from the bsd shell – can view that by tailing /var/log/ – loads in there).
Using Logging config you can set up rules to ensure only the errors that you want to see get logged in a specific place you outline. You can also write errors to other syslog servers if it’s critcal. Another way of logging in Junos is to enable trace options, which can be useful for debugging.
Not all logging facilities can be configured, but the ones that can are configurable from the edit system syslog heirarchy.
There is also a log severity indicator, the lower the number the more attention you should pay to the severity of the log entry.
| Severity | Description |
| 0 | Emergency |
| 1 | Alert |
| 2 | Critial |
| 3 | Error |
| 4 | Warning |
| 5 | Notice |
| 6 | Info |
| 7 | Any |
Monitoring messages in realtime
Similar to the tail -f command in linux, you can get a live feed of messages being logged to a file with the command run monitor start FILENAME.
Traces are very similar to the debug command in Cisco, and it provides debugging information in more depth than syslog, or anywhere else in Junos OS. They can be used for debugging specific functions or areas.
It is applies when you enable traceoptions within a configuration area.
Rescue Configuration
When your device first boots up it looks for your juniper.conf file. If this can’t be reached the device will try and roll back to the rescue configuration stored on the device.
The rescue configuration should be a known working configuration that has management access. It can be loaded on demand with the rollback rescue command in config mode. As the baseline config and use of the device changes, the rescue configuration can be changed too. The command to do that is:
request system configuration rescue save
To roll back to it it’s simply: rollback rescue.
System Configuration: NTP, SNMP and Archival
You can configure protocols frop the top level of the device:
#NTP setup
set system ntp server x.x.x.x
set system ntp boot-server x.x.x.x
#boot server can be the same as the ntp server and sets the system time on #boot, this is because if the standard ntp server is more than 1000 #seconds out from the system clock it won't accept the new time.
You can configure the device to synchronise the local time with an NTP server as well using the command:
set date ntp x.x.x.x
SNMP traps can be configured too, out of scope for this. Would be interesting to look into
Archival is a utility to automatically archive configurations of the box.
Under the system heirarchy using the command show archival you can take a look at the system configuration. An example of how this might look is below:
configuration {
    transfer-on-commit;
    archive-sites {
        "scp://user@10.0.0.1:/serv/path" password "passwordforservice";
    }
}
Setting an IP on an interface:
set interfaces ge-0/0/0 unit 0 family inet address 192.168.1.1/24
set interfaces ge-0/0/0 family inet address 192.168.1.1/24