Automated configuration management and deployment
Architecture and Capabilities
Why use Ansible?
Ansible accelerates the deployment and modification of infrastructure. Originally it was created to work just with computers and servers but it now supports network equipment as well.
Automates configuration management.
Provides idempotent operation: Means changes are made only once, even if a playbook is run multiple times. The desired state is defined (declarative), and changes are only made if they are needed to meet the desired state.
Standard Ansible Operation:
Module execution is perfromed on the managed device.
-Python modules are copied via SSH to each remote device and executed locally. – a requirement of this is that Python needs to be installed on the managed nodes.
-Playbooks, written in YAML, carry out the tasks defined in the python modules. – This was an issue with Junos because not all devices had space for additional python modules, or even had Python installed.
Junos Ansible Operation:
Junos modules are executed from the Ansible Management/Control Node – which opens a NETCONF session to the remote device to carry out playbook tasks.
The Python modules interface with teh XML API via PyEZ
Management Node Requirements:
Linux, OSX/MacOS, BSD
Python2.6+ or Python 3.5+
It can be installed using pip – if you don’t have pip installed run the following to install if for your specific user:
curl https://bootstrap.pypa.io/get-pip.py -o get-pip.py
python get-pip.py --user
You can then install ansible using pip for your specific user too (you can also do it globally but that may interfere with what’s already there).
Below this we install some other modules that are required for managing Junos through Ansible
python3 -m pip install --user ansible


python3 -m pip install --user paramiko
python3 -m pip install --user junos-eznc
python3 -m pip install --user jxmlease
There is also an Ansible role that isn’t actually required but you can pull more information using the Juniper.junos role on Ansible Galaxy (written and supported by Juniper)
ansible-galaxy install Juniper.junos
In order to interface with the netconf on our network device we also need to enable netconf over ssh on the control device (so the Router):
set system services netconf ssh
Ansible Module Types
Ansible Module Library:
Officially supported by Ansible
Written by Ansible
Ships with Ansible
Supported by Ansible Tower
Ansible Galaxy Module Library:
-Ansible Galaxy is the official community for sharing Ansible roles
-Not officially supported by Ansible – supported by community
-Home of Juniper’s Juniper.junos Ansible role (see above it is written and supported by Juniper)
-Seperate installation of roles (using ansible-galaxy install <role>)
Ansible Modules
Ones that are in the Ansible Library by default without any additional roles installed through galaxy:
| junos_command | Allows for running arbitrary commands on a Junos Device |
| junos_config | Manages the config database and makes config changes |
| junos_package | Installs packages on the managed Juniper device |
| junos_facts | Collects device information and facts from the managed device |
| junost_rpc | Runs an arbitrary RPC on the managed Juniper device |
| junos_user | Used to manage local user accounts on the Juniper device |
Ones that are introduced with the Juniper.junos Role
| juniper_junos_command | Allows for running arbitrary commands on a Junos Device |
| juniper_junos_config | Manages the config database and makes config changes |
| juniper_junos_software | Installs software on the managed Juniper device |
| juniper_junos_facts | Collects device information and facts from the managed device |
| juniper_junos_rpc | Runs one or more arbitrary RPC on the managed Juniper device |
| juniper_junos_jsnapy | Execute JSNAPy workflows on the managed device |
| juniper_junos_srx_cluster | Add or remove SRX cluster config |
| juniper_junos_system | Execute operational actions on the managed device |
| juniper_junos_ping | Ping from the managed Juniper device to retrieve results |
| juniper_junos_pmtud | Perform path MTU discovery from the Junos device to a destination using the ping command. |
Ansible Inventory
Defining Ansible managed devices and device groups
(On unix/linux) the inventory location by default is:
/etc/ansible/hosts
When executing a playbook, or in the ansible.cfg file you can change this location if you want to.
Each host is defined either by its IP address or its hostname. If using a hostname it must be resolvable by the Ansible Management/control Node.
Host groups are named (maybe a Routers group, or a Switches group) and contain one or more hosts or groups. (hosts and groups can be members of one or more groups – but a group can only have either groups or hosts in it, you can’t mix and match)
Host and group valiables may be stored in the inventory file or seperate files.
If there is no /etc/ansible folder already, then you can create one with:
sudo mkdir /etc/ansible
cd ansible
sudo touch hosts
Example ansible host file for managing our single device (and putting it in a group, and then referring to the group in another group). because I’ve set my device to resolve R1 to its IP (10.1.1.1) I can use its hostname, if this isn’t possible on your device just use its IP instead
#comments can be included with the hash key

[vsrx]
R1

[routers:children]
vsrx
Our inventory (or a custom inventory) is specified at the time of execution. If a custom inventory is not specified Ansible will use the default inventory at /etc/ansible/hosts (examples below)
ansible-playbook get-bgp.yml
ansible-playbook get-bgp.yml -i customInventory.txt
If you only want to run this playbook against certain devices or groups that can be done too using the -l (–limit) flag
ansible-playbook get-bgp.yml -l R1
ansible-playbook get-bgp.yml -i customInventory.txt --limit vsrx
ansible-playbook get-bgp.yml --limit @rety_hosts.txt
Ansible Playbooks
The building blocks of Ansible network automation
A playbook is used to execute a series of ‘plays’
Each play consists of one or more tasks which execute modules against inventory (hosts or a collection of hosts).
Each task can take arguments such as output from a previous task or static information. Output of a task may be saved to be used later in the playbook using register.
These tasks call functions defined in Ansible Modules which are coded in Python.
Playbooks are written in YAML and follow a very distinct format. Below is a template for the initial play information for a Juniper device.
---
- name: Play Name #name of the play
  hosts: vsrx #specify which hosts in the inventory
  roles:
    - Juniper.junos #import the Juniper.junos ansible galaxy role
  connection: local #tells ansible we are running these plays locally
  gather_facts: no #and not to gather facts as we are using netconf
If you want some user input (for example usernames and passwords) before the play then this can be done using vars_prompt
vars_prompt:
- name: USERNAME
  prompt: Device username
  private: no
- name: PASSWORD
  prompt: Device Password
  private: yes
This next part is a task, in which the juniper_junos_facts module is used to gather device information in. It uses the user and password parameter entered above for authentication to the devices.
register is then used to save the output of the module to the variable device_facts for use later in the playbook.
tasks:
- name: Get Junos Device Facts
  juniper_junos_facts:
    user: "{{ USERNAME }}"
    passwd: "{{ PASSWORD }}"
  register: device_facts
there is also a debug module that can be used to output the information to the console.
- name: Print Device Facts
  debug:
    msg: "{{ device_facts }}"
and now all together:
---
- name: Play Name #name of the play
  hosts: vsrx #specify which hosts in the inventory
  roles:
    - Juniper.junos #import the Juniper.junos ansible galaxy role
  connection: local #tells ansible we are running these plays locally
  gather_facts: no #and not to gather facts as we are using netconf

  vars_prompt:
  - name: USERNAME
    prompt: Device username
    private: no
  - name: PASSWORD
    prompt: Device Password
    private: yes

  tasks:
  - name: Get Junos Device Facts
    juniper_junos_facts:
      user: "{{ USERNAME }}"
      passwd: "{{ PASSWORD }}"
    register: device_facts

  - name: Print Device Facts
    debug:
      msg: "{{ device_facts }}"
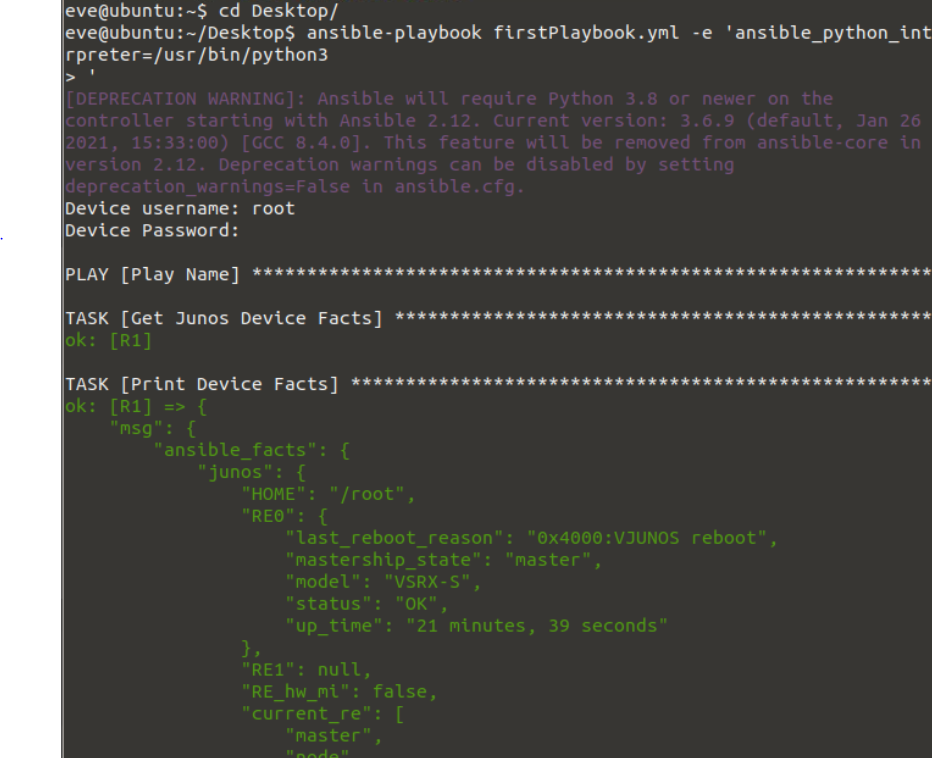
I’ve saved this as firstPlaybook.yaml. To run it run the following command (I had to point to my Python interpreter because it couldn’t find the right one initially)
ansible-playbook firstPlaybook.yaml -e 'ansible_python_interpreter=/usr/bin/python3'
Using Ansible
Executing Ad-Hoc Modules
Modules can be executed individually, outside of a playbook.
It’s generally not recommended and not particularly useful for juniper devices, due to the amount of manual and custome configuration needed.
Ad-hoc modules are executed using the ansible command
Not recommended – host key headaches
-m specifies the module to run (only Ansible base modules are searched by default
-u specifies the username to connect to the device with
-k asks for the password
[IP] should be replaced with the IP or hostname of the device to execute the module against (Must be listed in the Ansible inventory file)
Local connection type must be specified for Juniper devices, done in the inventory file. (It gave me an error at first, so I had to install sshpass (sudo apt-get install sshpass) – you also need to edit your inventory file to specify that commands run against that device need to be run locally.
ansible 10.1.1.1 -m junos_facts -u root -k
Executing a Playbook
Playbooks are executed using the ansible-playbook command as shown above. You can specify a custom inventory file when you run this command with the -i argument.
You can use –list hosts to only show the list of devices which the playbook would execute against. (this does not run the plays though)
-l or –limit to limit the hosts to execute the playbook against (see above).
–list-hosts considers this argument when listing the hosts the playbook would execute against.
