An Etherchannel is a number of connections from one device to another acting together logically as one connection. This provides both link redundancy and combined bandwidth or the two links.
EtherChannel is used to combine links from one networked device to another logically so they act like one line (for example you can connect two switches together, or a switch to a server). This can be helpful when you’re trying to load balance. It can be used in conjunction with STP, but essentially replaces it.
There are multiple ways to load balance, you can do it by MAC address, IP address or even by Port number (which is probably the preferred way of doing it, so if there are multiple services on the same device they can be load balanced).
This can be done with up to 8 connections between devices, but it works best when the number of links are either 2, 4 or 8. All sorts of devices can be connected via EtherChannel: Servers, Wireless Access Points, other switches, all sorts.
Note: Other vendors have different names for EtherChannel, Some call it a LAG port, confusingly enough on HP switches they call it a trunk
How to implement EtherChannel
Onto the setup, there are a few things that need be considered.
The Interfaces that are intended for EtherChannel must have the same configuration/setup on BOTH SIDES. So they have to have identical Speed, VLAN assignment, mode and duplex settings.
It’s best practice to start by shutting down the Interfaces that you’re going to be configuring.
Then you actually create the EtherChannel using the Channel-Group command to create a “Virtual Port-Channel Interface” which you’d configure like any other interface.
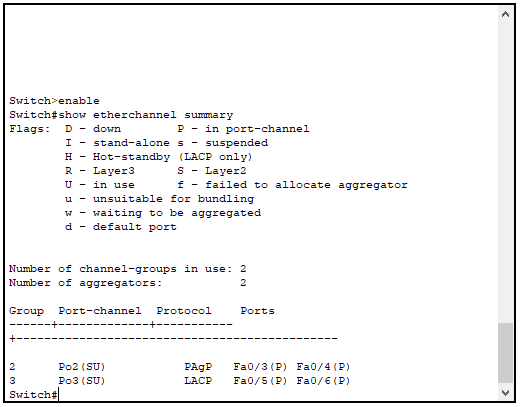
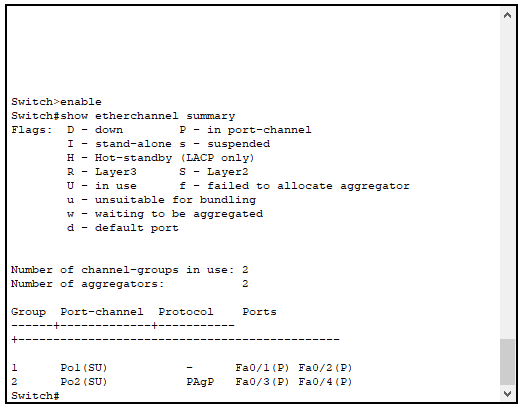
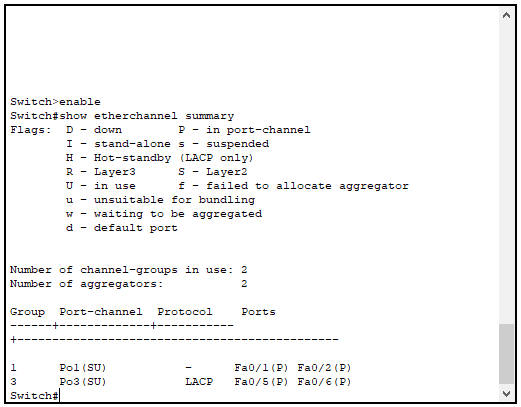
Verify your configuration by using the command: Show EtherChannel Summary
Static
This is not the recommended way to enable EtherChannel because when incorrectly configured it can cause a spanning tree loop on the network.
It is implemented using the commands below, I’m connecting Switch 1 and Switch 2 together using Static EtherChannel.
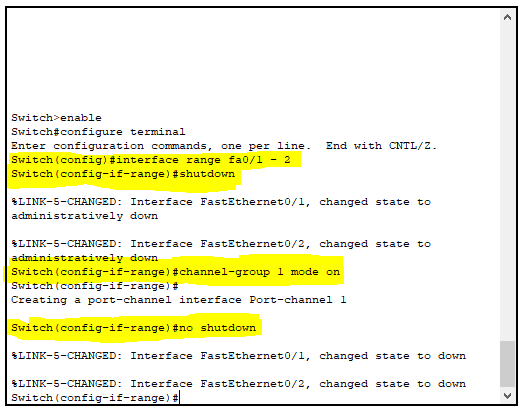
When configuring static EtherChannel it is especially important to shut down the interfaces you’re changing before you start. If you don’t you’re quite likely to cause a loop.
Switch 1

enable
interface range Fa0/1 – 2
shutdown
channel-group 1 mode on
Switch 2 has an almost identical setup as Switch 1 in this setup. Only difference is that you can bring the line back up as it’s still administratively down on the other side.
enable
interface range Fa0/1 – 2
shutdown
channel-group 1 mode on
no shutdown
Switch 1 – And once it’s set up on both sides we can bring the interfaces back up on switch 1.
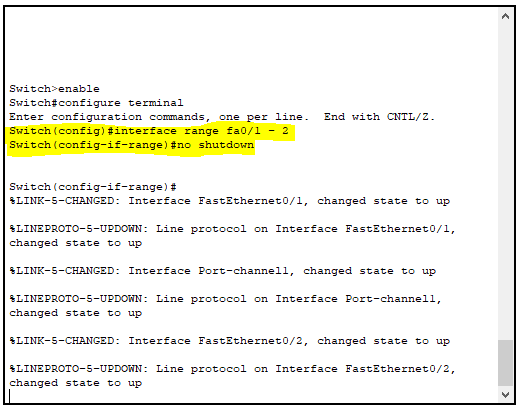
no shutdown
PAGP
Cisco propietary negotiation protocol, allows EtherChannel
On: Essentially the same as Static, this is where the EtherChannel is hard coded to the port, and opens the network up to the risk of loops.
Desirable: It is recommended that the interface on one switch be configured as Desireable and the Other side be configured as Auto. If they are both configured as Desireable it will still work but will be a little slower.
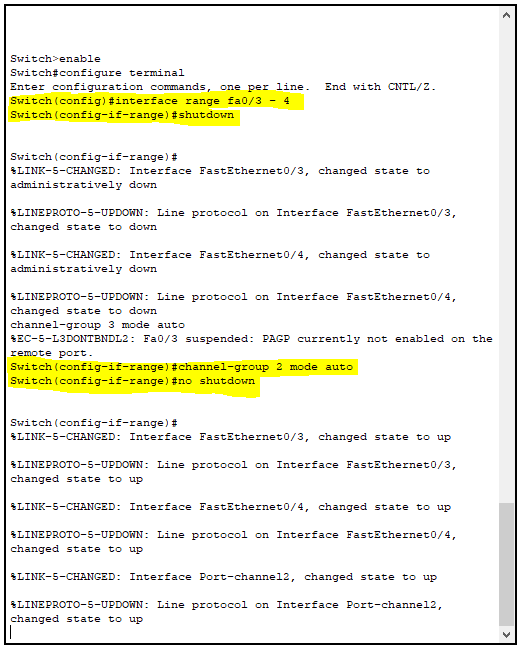
Below I’ve implemented PAGP in the packet tracer environment connecting Switch 1 to Switch 3:
Switch 1 config – we choose desirable as the mode on switch one in this example, and on switch 2 we set it to auto but it can be the other way round too.

enable
interface range Fa0/3 – 4
shutdown
channel-group 2 mode desirable
no shutdown
Switch 3 again the same config as switch one, but in this case we have set switch 3 to auto.
enable
interface range Fa0/3 – 4
shutdown
channel-group 2 mode auto
no shutdown
LACP
Industry standard negotiation protocol, this works in a very similar way to PAGP but can be used with other switch vendors. Cisco also supports LACP, but keeps their proprietary one in too.
On: Exactly the same as ON in PAGP, again not recommended to hard code the EtherChanner.
Active and Passive are essentially just reskins of the Desireable and Auto settings respectively on PAGP and the same recommendations apply.
Below you can see I’ve finished off EtheChanneling up the network by using LACP to connect Switch 2 to Switch 3:
Below is the configuration on Switch 2, which will be the Active side of the EtherChannel.
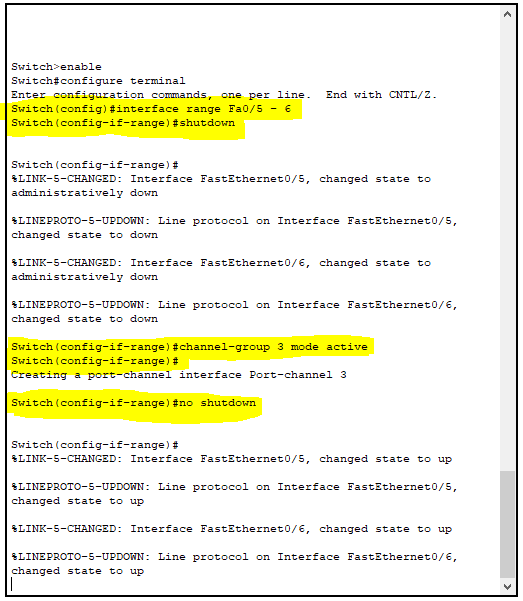
enable
interface range Fa0/5 – 6
shutdown
channel-group 3 mode active
no shutdown
Under this is the LACP configuration for switch 3 so it can connect with Switch 2:
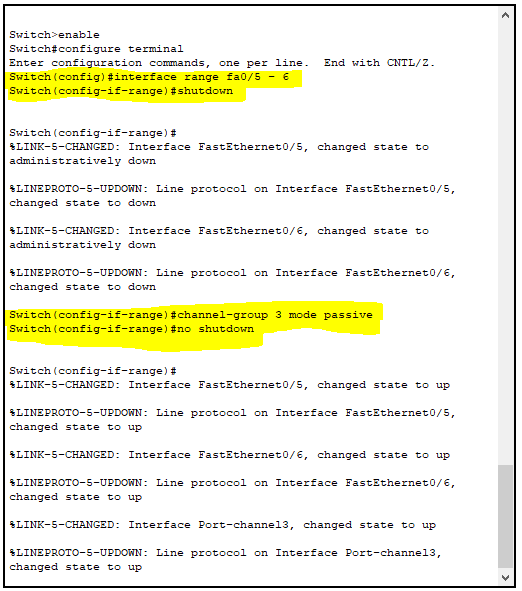
enable
interface range Fa0/5 – 6
shutdown
channel-group 3 mode passive
no shutdown
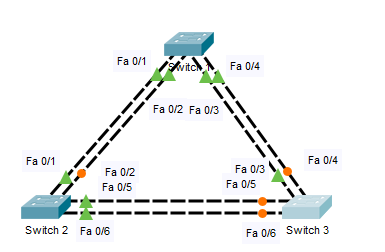
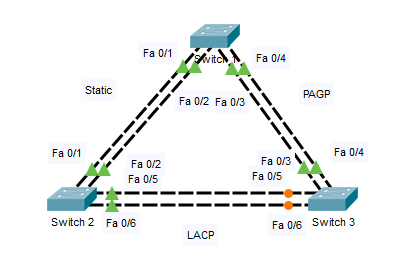
And here this is our finished network diagram of what we have implemented. I’ve labelled each connection with which EtherChannel mode is being used but we can see EtherChannel is working as internded.
Below are the EtherChannel summaries for each of the switches, shown using the command that can be used in elevated mode: show etherchannel summary
Switch 1
Switch 2
Switch 3